 |
|
| |  |
 |
 |
|
|
MECHANICAL SURFACE TREATMENTS
Mechanical plating
This is a room temperature process in which articles to be plated (typically steel) are tumbled with powdered metals mixed with inert particles (e.g. glas beads) in water. The deposited metals, which become cold - welded the substrate surface, include zinc, zinc alloys, copper, tin and aluminium, also some combinations of these.
Process sequence
1. part pretreatment, pickling and degreasing etc
2. copper flash electroplate
3. tin flash electroplate
4. add metal dust
5. tumble
6. rinse
7. off - line passivation
Advantages
- no hydrogen embrittlement
- no detempering of steels
- good corrosion resistance
- uniform deposit thickness
For more information refer to www.bodycote.co.uk
Shot peening
Shot peening is a method of introducing compressive strain in a surface with the aim of
- increasing the fatigue strength of a material
- decreasing the tension in the surface
- getting rid of deformations, or aiming at the creation of deformations
- decreasing the susceptibility of stainless steel and aluminium alloys to electrochemical corrosion.
Shot peening differs from grit blasting in that the particles are less sharp, and the whole process can be carried out with higher precision. In shot peening the surface cleaning effect generally is of less importance.

Numerically controlled shot peening installation
The drawing shows a large, very critical airplane component which is treated in a 3-Axis numerically controlled shot peening installation, with EIA standardized programming.
Properties
The effect is determined by the size of the shot peened surface and the intensity of the treatment. This intensity directly influences the depth of the compressed layer and the compressive strain. If a surface is not being completely treated by shot peening an increase in fatigue strength may not be expected.

Relation between the depth of the compressive layer and the peen intensity for steel alloys with different hardness values. The Almen rating is determined by unilaterally peening of a test strip after which the bending of the strip is measured.
The desired effect will only be obtained if the recommendations of standard SAE J443 are completely followed. The shot peening process can be controlled and optimized using test strips. Evaluation is done in several ways, in practice most often a visual evaluation is sufficient.
The fatigue strength of aluminium alloys can be increased by 25 to 36% depending on the alloy composition. The mechanical strength is increased by about 25%. Incubation of stress corrosion cracking is delayed in a spectacular way: examples of a 35- to 50-fold increase in lifetime are reported.
Hardened steel for springs and piano wires shows an increase in fatigue strength of 10 to 58%. The increase in case of soft steel however is small or even smaller compared to steel which is polished.

The fatigue strength of peened and untreated test pieces, for smooth and for notched surfaces as function of the tensile strength of steel.
Low alloyed steel shows a 10-30% increase in the fatigue strength.
The incubation of stress corrosion cracking in stainless steel is slowed down by a factor of more than 10. The shot peening effect is decreased will increase in strength, so that the maximum residual strain in hard materials is limited to about half the yield point of the material. Often it is possible, however, to increase the yield point by shot peening, by drawing the material. Most applications therefore are products subject to uniaxial tension, such as springs, gears and shafts.
The effect generally spreads to a depth of 0.1 to 0.25 mm under the surface, and is well reproducible. Maximum depth is 0.75 mm.
Substrate
The shot peening method is only operated on materials which can be cold hardened.
Further information
This is best sought from specialist companies e.g. www.wheelabratorgroup.com
Process characteristics
During shot peening hard particles are shot on a metal surface with high speed under controlled process conditions. In this way shallow rounded indentations are formed in the material surface.

Every particle that hits the surface acts like a little hammer and causes a deformation in the surface. The surface area increases, in other words the surface deforms under tensile stress. Under the surface, the material tries to recover the original dimensions by building up compressive strains under the deformation pits.
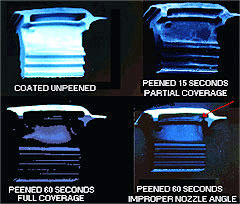
The surface should be completely covered by the particles during shot peening. Visual control is difficult, but a special contrast fluid is used for this.
 |
|
A fluorescent liquid is put onto the surface and forms an elastic layer. This is removed during shot peening at a rate which is proportional to the percentage of the surface which has been hit. The removal can easily be determined by UV light. |
The peening intensity is determined by the speed, hardness, diameter and mass of the particles, as well as by the angle under which the surface is bombarded.
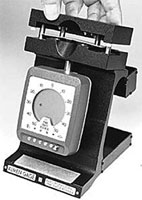
The intensity is measured in the Almen Index. This is the bending of a small strip after unilateral shot peening. This is a very discriminating test which allows a good process control.
 |
|
Almen gauge for measurement of the Almen Index. On the top a calibrated Almen strip is placed after shot peening. The bending of the strip as measured by the measuring instrument indicates the residual stresses. |
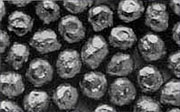
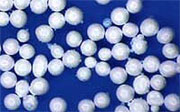
The shot peening balls are made of (white) cast iron, normal steel or glass. Both dry and wet shot peening is done with glass balls. Also ceramic balls may be used.
 |
 |
Steel shot. Standard design, there
are more expensive, more circular,
or cheaper, more angular qualities. |
Ceramic shot. |
The equipment generally is similar to grit blasting, except that a more precise control is needed. In order to accelerate the particles there are two methods: using a rotating wheel, or using compressed air.
The wheel method is more accurate, compressed air peening is less expensive and higher particle speeds are obtained.

Schematics of a shot peen installation of intermediate size.
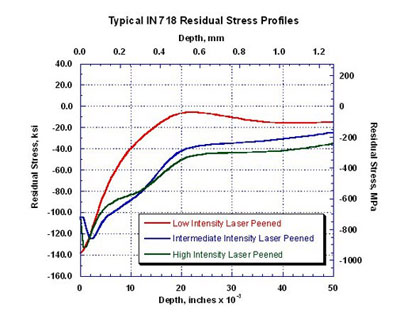
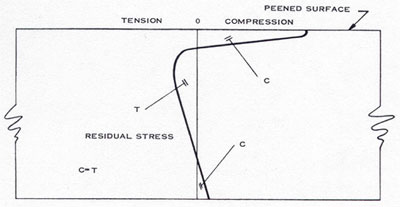
An alternative process, very recently developed, is laser peening. First the surface is covered by a black layer with a thin layer of water on it. A laser beam is pulsed through the water and the black layer absorbs energy. As a result in the water layer a rapidly expanding plasma is generated, which causes a shock wave in the substrate material. This generates compressive strains in the substrate, which compared to shot peening reach a greater depth (1 to 3 mm) and a more even tension gradient.
 
Schematics of laser peening
Distribution of residual strain under the surface. By changing the beam intensity the tension gradient can be influenced.
The compressive strains compensate for an external tensile strain, resulting in a lower net tensile strain in the surface. Shot peening also leads to a redistribution of surface strains and results in a decrease of stress concentrations as well as residual stress caused by machining and/or thermal treatment. This is especially favourable for machined or milled surfaces which exhibit residual surface stress.

Increase of fatigue strength after grinding and machining of steel surfaces
The process optimum is the minimum peening intensity causing just sufficient compressive stresses for the application. Too strong peening might causes residual effects, by introducing too high tensile stresses under the compression zone.
Balancing the diameter and mass of the particles with the speed is important: a higher speed might be advantageous, but could also lead to breaking of the balls. This should be avoided since sharp particles will behave as grit. The hardness of the balls should be higher than the work piece, but is otherwise of no influence.
Pretreatment
The surface should be free of major impurities. Water, oil and grease will pollute the particles, decreasing the effectiveness. Removing impurities with standard cleaning agents should be sufficient.
The surface of forged or cast materials is more sensitive to peening than that of polished materials.
Layer formation
The shot peening effect is largely influenced by manipulation of the work piece. Complex transport systems and positioning devices may be needed. The nozzle diameter (the nozzle will wear internally) and the distance to the work piece need to be precisely controlled. Precise process control is also needed in case of sensitive materials.
Local peening is possible, but requires masking of the remaining surface, e.g. using tape or other screening materials.
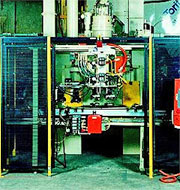
A shot peening chamber (patented) with transport unit and camera operated robot for automatic charging and discharging.
After treatment
Mechanical after treatment should be avoided except in case of aluminium and magnesium alloys. These can be shot peened to a larger depth, so that about 0.1 mm is available for machining afterwards. This means that in many cases the surface roughening caused by peening should be accepted. Also dimensioning using conventional methods should be avoided.
For some applications the deposition of a corrosion resistant organic layer is useful, since the clean shot peened surface is very sensitive to chemical attack and susceptible to fingerprints.
Stainless steel should be passivated after shot peening and in cases where it has been shot peened with steel particles a light peen treatment with glass is sufficient to remove the steel particles.

Wheels shot peened with stainless steel shot, showing an active, matt surface.
Advantages and disadvantages
Advantages:
- decrease of tensile stresses in the surface and compensation for deformations without thermal treatment.
- widely applicable, easy to control
Disadvantage:
- thin work pieces are susceptible to deformation
Cost
The cost of a shot peening treatment is determined by the shot material, the process conditions (which will vary from work piece to work piece) and by the hardness, dimensions and form of the work piece. The peening speed greatly influences the consumption of particles, but might decrease the working time.
Applications
The most important application is prevention of fatigue. Well known applications are peening of crankshafts, gears, turbine blades and fans
Shot peening is especially effective in:
- decreasing residual stresses as a result of mechanical treatment
- preventing concentrations of tensile stress in notches, sharp angles, forging pits and other surface defects
- preventing negative effects on the strength in the heat treated zone of welds and in decarburized surfaces after heat treatment.
 |
 |
4.5 m long 16-cylinder crankshaft ready
for shot peening |
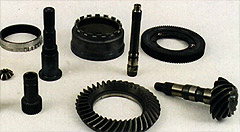
Overview of gears whose properties can be improved by shot peening |
Peening is very suitable for deformation of thin work pieces. This is used for various aerospace parts, e.g. large wing panels which obtain an aerodynamic shape after shot peening. Pressing these panels in the required shape would lead to unacceptable tensile stresses. Another application is the improvement of contact surfaces. Extensive wear can be avoided since oil is retained in the surface pits caused by shot peening.
In golf clubs the surface effect of shot peening leads to a better grip so that the ball can be hit with improved effect.
Shot peening is also often used for compensation of deformation, e.g. in case of large round gears, which deform during heat treatment, or for of long thin axles or extruder screws.
Finally, peening can be used in the prevention of stress cracking corrosion in aluminium and magnesium alloys, brassand stainless steel.

Example of a shot peened surface. The original surface is completely covered by overlapping pits.

Micrographs of peened and non-peened type 304 stainless steel plate (sensitized at 1200F 1 hour and tested for intercrystalline corrosion in a N H3-HF solution, peened with ceramic shot).
Limitations
As long as the surface can be reached by the particles there are few limitations. The chamber for peening determines the maximum work piece dimensions, but mobile shot peening is also possible.
The peening of sharp edges and screw threads is limited to the smallest ball diameter available, normally 0.02 mm for glass balls. Cutting edges cannot be peened.
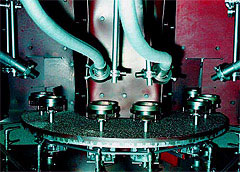
Shot peen installation in a chamber with three peen stations and two different work pieces on each station.
The effect of shot peening is quickly nullified by wrong after - treatment. For instance, the work piece is more sensitive for thermal treatment, although short heating to 230oC has no influence on peened low alloyed steel. Various aluminium alloys can only be heated up until 175oC after peening.
Shot peening does change dimensions to a certain extent. Holes in a shot peened surface can turn into oval, esp. in thin sheets where the mechanical properties are not isotropic.

Shot peening of a mould by hand using a mobile installation with the aim of improving the form and surface structure.
| 
|
| 
|

|

|
|

